
Connecting Raymarine NMEA2k data to Home Assistant
Usually, a large proportion of working with Home Assistant involves installing your own sensors and switches in a house. Where boats differ from houses, though, is that most of them already have a large number of sensors and switches already on board. These largely fall into two categories: Power management, and instruments.
I managed to get all our power management data into Home Assistant relatively easily using Modbus to pull data from our Victron system – but, until now, getting data from the boat's instruments has been a project mired in dead ends.
A little background, if you're new to marine systems:
Almost all boats have instruments for measuring environmental and navigational data, such as wind speed, depth and heading. These components are all part of a network, generally connected to a chart plotter which can read and display the data. Whether you use Raymarine, B&G, Garmin, or something else, all modern marine systems use the same networking standard for the instruments to communicate with one another; called NMEA.

So, as long as your instruments are powered up, there's a huge amount of useful data flowing through the NMEA network at all times. The challenge, here, is how to get to it.
NMEA network cables have standardised connectors, but most marine companies invent their own, new connector, so that they can patent it, have it be incompatible with their competitors, and make more money. Such is the marine industry.
Our boat uses Raymarine navigational equipment, and the Raymarine 'flavour' of NMEA is called SeaTalk. Same thing. Different connector. So the first challenge is one of hardware, figuring out how to connect a computer to the network to be able to ingest the data and pass it to Home Assistant.
Conveniently, most marine companies also sell adapter cables from their proprietary bullshit to the open standard which they're co-opting. If you live somewhere with access to Amazon, it'll only set you back $50. Unfortunately I purchased mine in the BVI, where it was $130.

Raymarine SeaTalk-Ng to NMEA2k
Allows you to connect a Raymarine SeaTalk network to a standard NMEA2k network.
The next step is to decide what device you want to use to connect to the network and ingest the data. There are quite a few different options here.
- You could use this $189 yacht devices ethernet adapter to connect the computer running Home Assistant directly.
- You can get a Raspberry Pi with an NMEA connector 'hat' and use that as a gateway.
- Or, if you're using a Victron CerboGX, you can connect directly to that.
I chose the last option, because I already use the Cerbo to get all my energy data into HA, and that was a pretty good experience. Regardless of which setup you prefer, the following steps will be largely the same.
Next hardware challenge: Connecting NMEA2k to Victron. Solution: Another overpriced cable to turn the open standard back into a (different!) proprietary one.

Once the cables are connected from your device of choice to the boat's NMEA network, you now have a hardline connection for NMEA data. So, how do we get to it?
The most common method for interacting with data on an NMEA network with a computer is using an open source piece of software called SignalK.
Signal K was developed by boaters for boaters, with the intention of using the latest mobile and web technologies to give you access to the same experiences on your boat as you have on land. Many of the developments happening in home automation and the “Internet of Things”, can be marinised for use on pleasure boats, bringing new functionality and solutions, that will enrich your boating activities.
If you're using a Raspberry Pi, or connecting directly your HA computer using the YachtDevices adapter, you'll need to install and set up SignalK yourself.
If you're using a Victron Cerbo, however, SignalK is already built in, and just needs to be enabled by switching the Cerbo operating system from Venus OS to Venus OS:Large.
First, make sure you're on the latest firmware (at least v2.90) - then, go to Settings → Firmware → Online Updates → Image type, and select "Large"
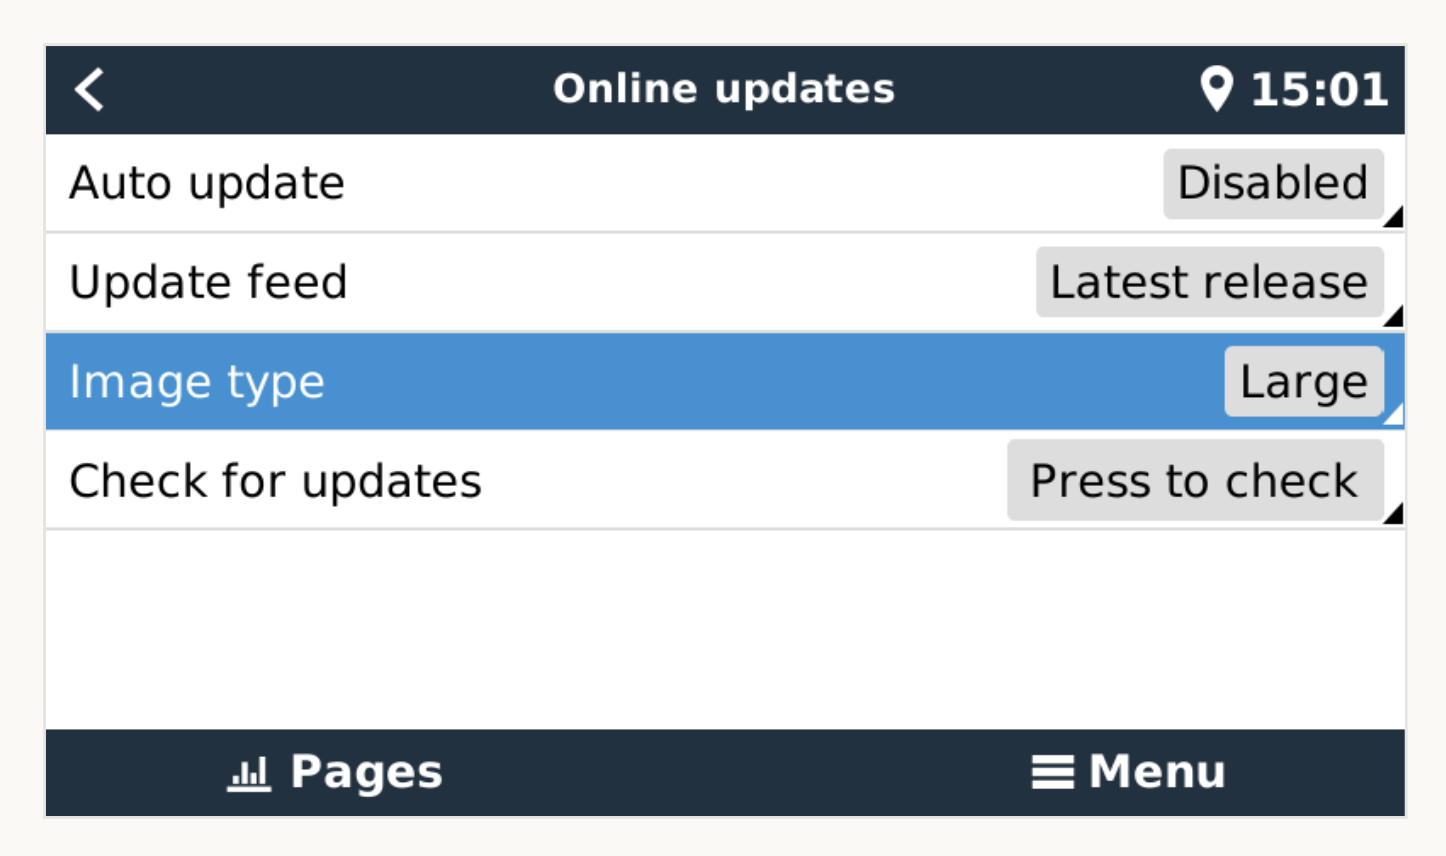
Venus OS:Large is an extended version of Victron’s operating system, made specifically for boats, and has two apps built-in: SignalK (for ingesting NMEA data), and Node-RED (for automation).
Once installed, you can enable SignalK by going to Settings → Venus OS Large Features and turning on SignalK. Do not enable Node-RED (more on this later). Once enabled Victron will start the SignalK app, and make it available on http://venus.local:3000.
If the URL doesn’t work, you may need to try using the Cerbo’s IP address in place of venus.local. And if you get SSL warnings/errors in your browser (which is fine), you will need to click “Advanced” and bypass it. Sometimes Chrome won’t allow you to bypass it, in which case you’ll need use a different browser.
Setting up SignalK
When you load SignalK, if everything is connected correctly, you should immediately see n2k-on-ve.can-socket in the dashboard connection activity. This means that SignalK is correctly receiving data.

To take a look at what kind of data is available, you can go into the Data Browser section and scroll through all the different properties that are being read:

The final challenge is getting the data out of SignalK and into Home Assistant, which is running on a different device.
This part stumped me for a long time, and searching the internet yielded no helpful advice of any kind — which, of course, is the reason that BoatHackers exists — to hopefully make it easier to figure out for anyone else trying to do the same thing in future. Or me, when I try to do the same thing in future and have promptly forgotten all of it.
Earlier, I mentioned not to enable the Node-RED app in the CerboGX, and there's a good reason for this. If using the Rode-RED app that comes with Venus OS:Large, it doesn't have access to NMEA data. It only has access to data from the Cerbo itself. So the purpose of that version Node-RED is if you want to automated things in your Cerbo (useful for people without Home Assistant).
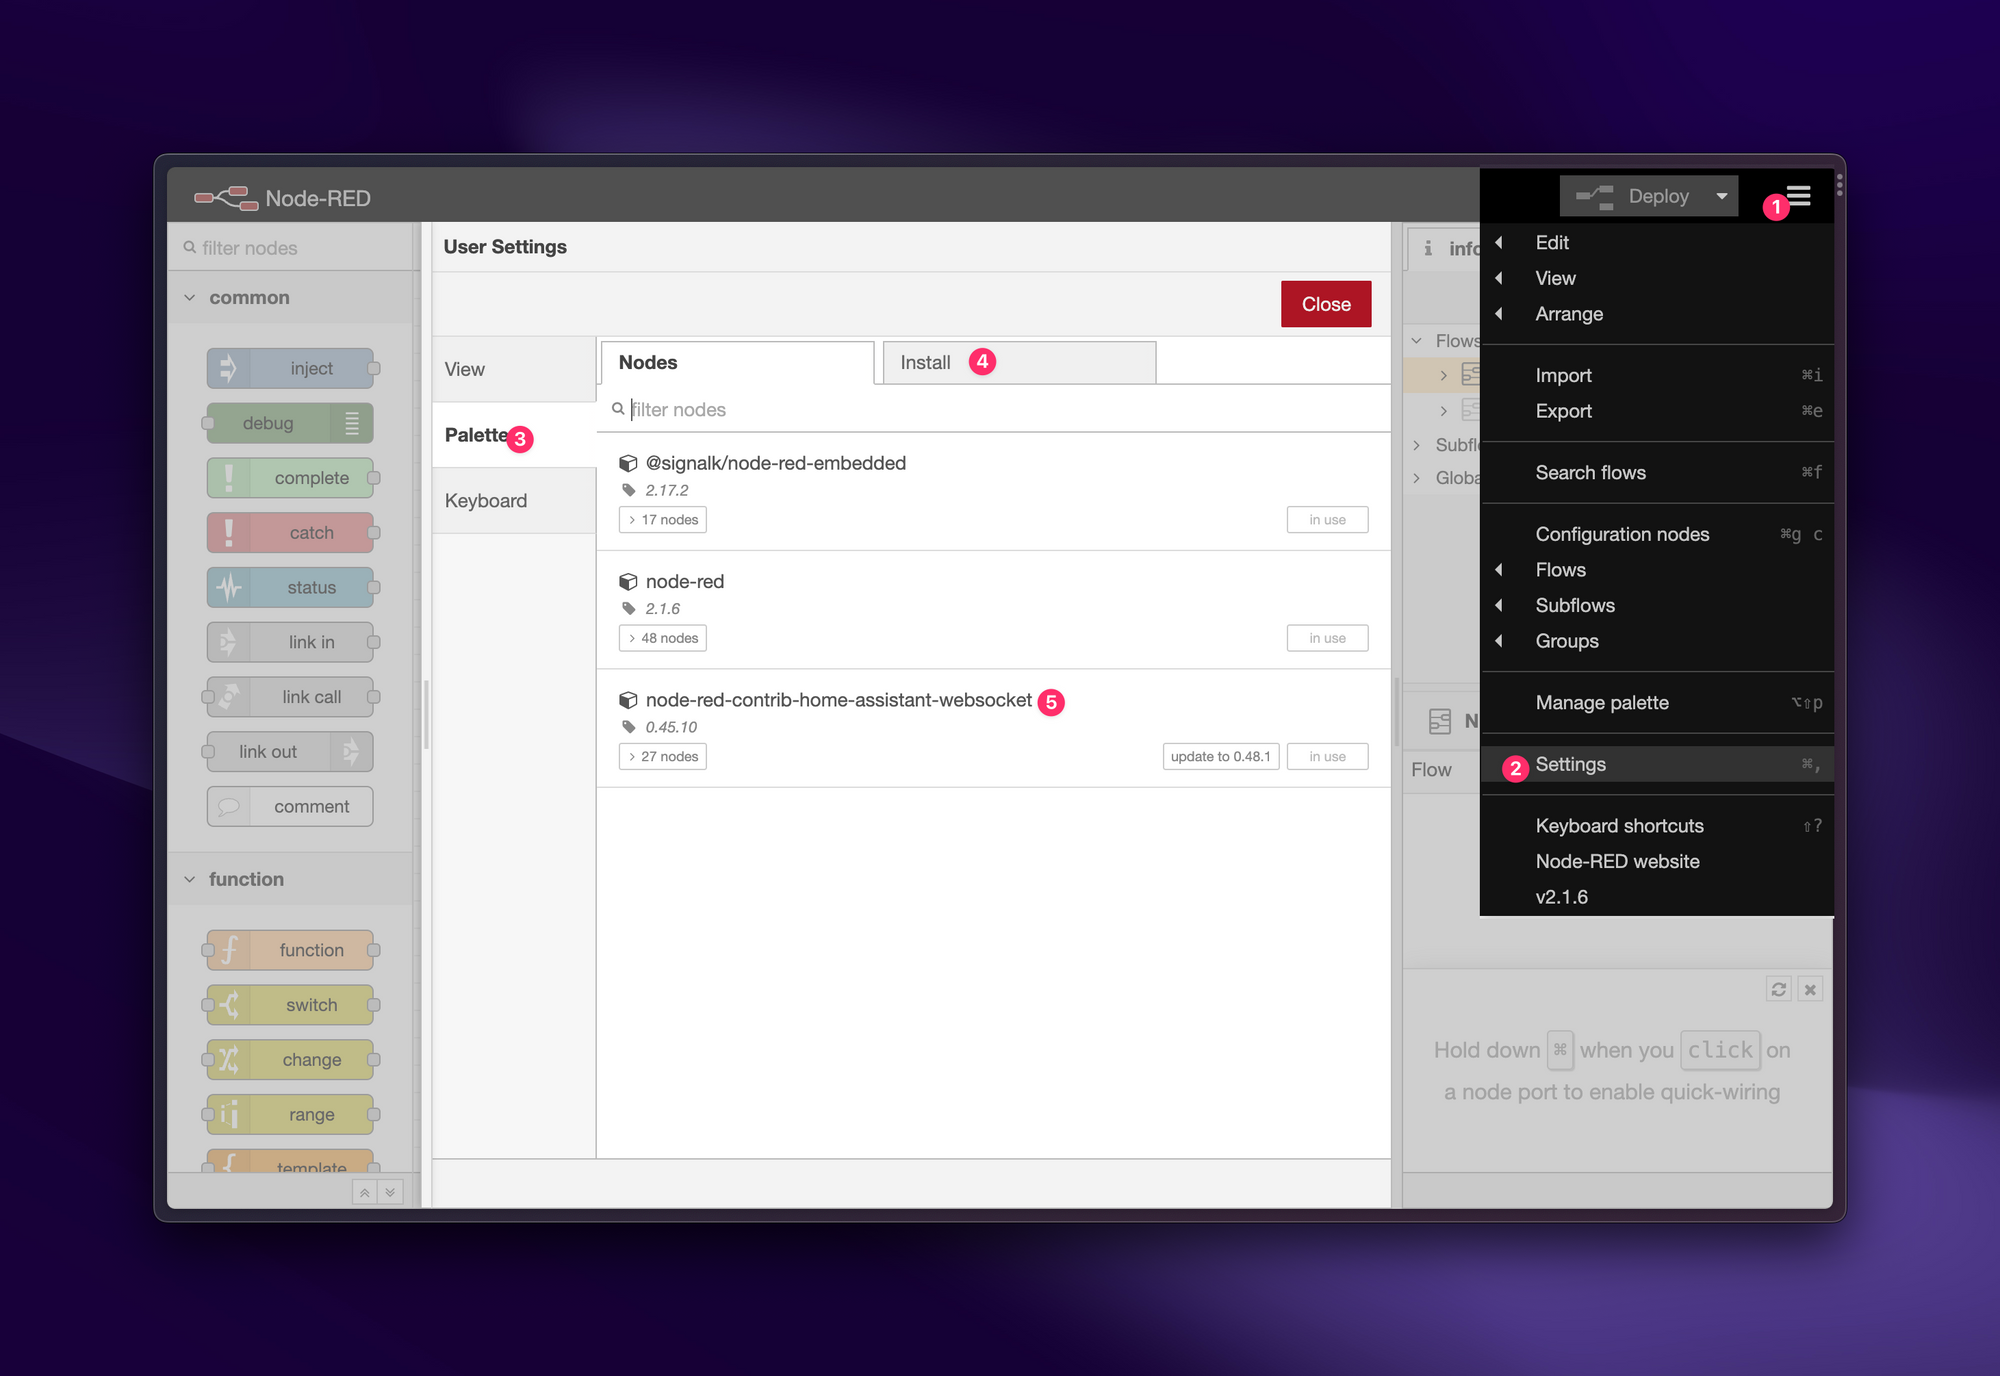
Instead, you can install Node-RED inside SignalK as an addon, so that it does have access to all the SignalK/NMEA data to work with. To do this, go to the 'App Store' inside SignalK, search for node-red, and install the app.

Once installed, navigate to Webapps → SignalK-Node-RED to open the app:

Setting up NodeRED
Next you'll install the Home Assistant addon inside Node-RED by going into the menu, selecting Settings → Palette → Install and searching for node-red-contrib-home-assistant-websocket - then click the Install button.
With everything set up, we can now pipe data all the way from the boat's instruments through to sensors in Home Assistant.
We'll start with getting wind speed as a simple example. From the left sidebar in NodeRED, drag in a SignalK Subscribe node, a Function node, and a HomeAssistant Sensor node. Like this:

Each node needs to be configured, so we'll do them one by one, starting with the yellow subscription node. Double click to configure it, and enter settings as follows. Each NMEA sensor has a "Path" where it can be accessed. You can find the path in the Data Browser area of SignalK that we looked at earlier. Every sensor will have its path listed beside it there.

The next node to configure is the Function. Almost all data that somes over NMEA is in a format that you probably don't want, and requires converting to a format you do want. In the case of wind speed, that data comes in meters per second. Using the function node, we can convert to knots.

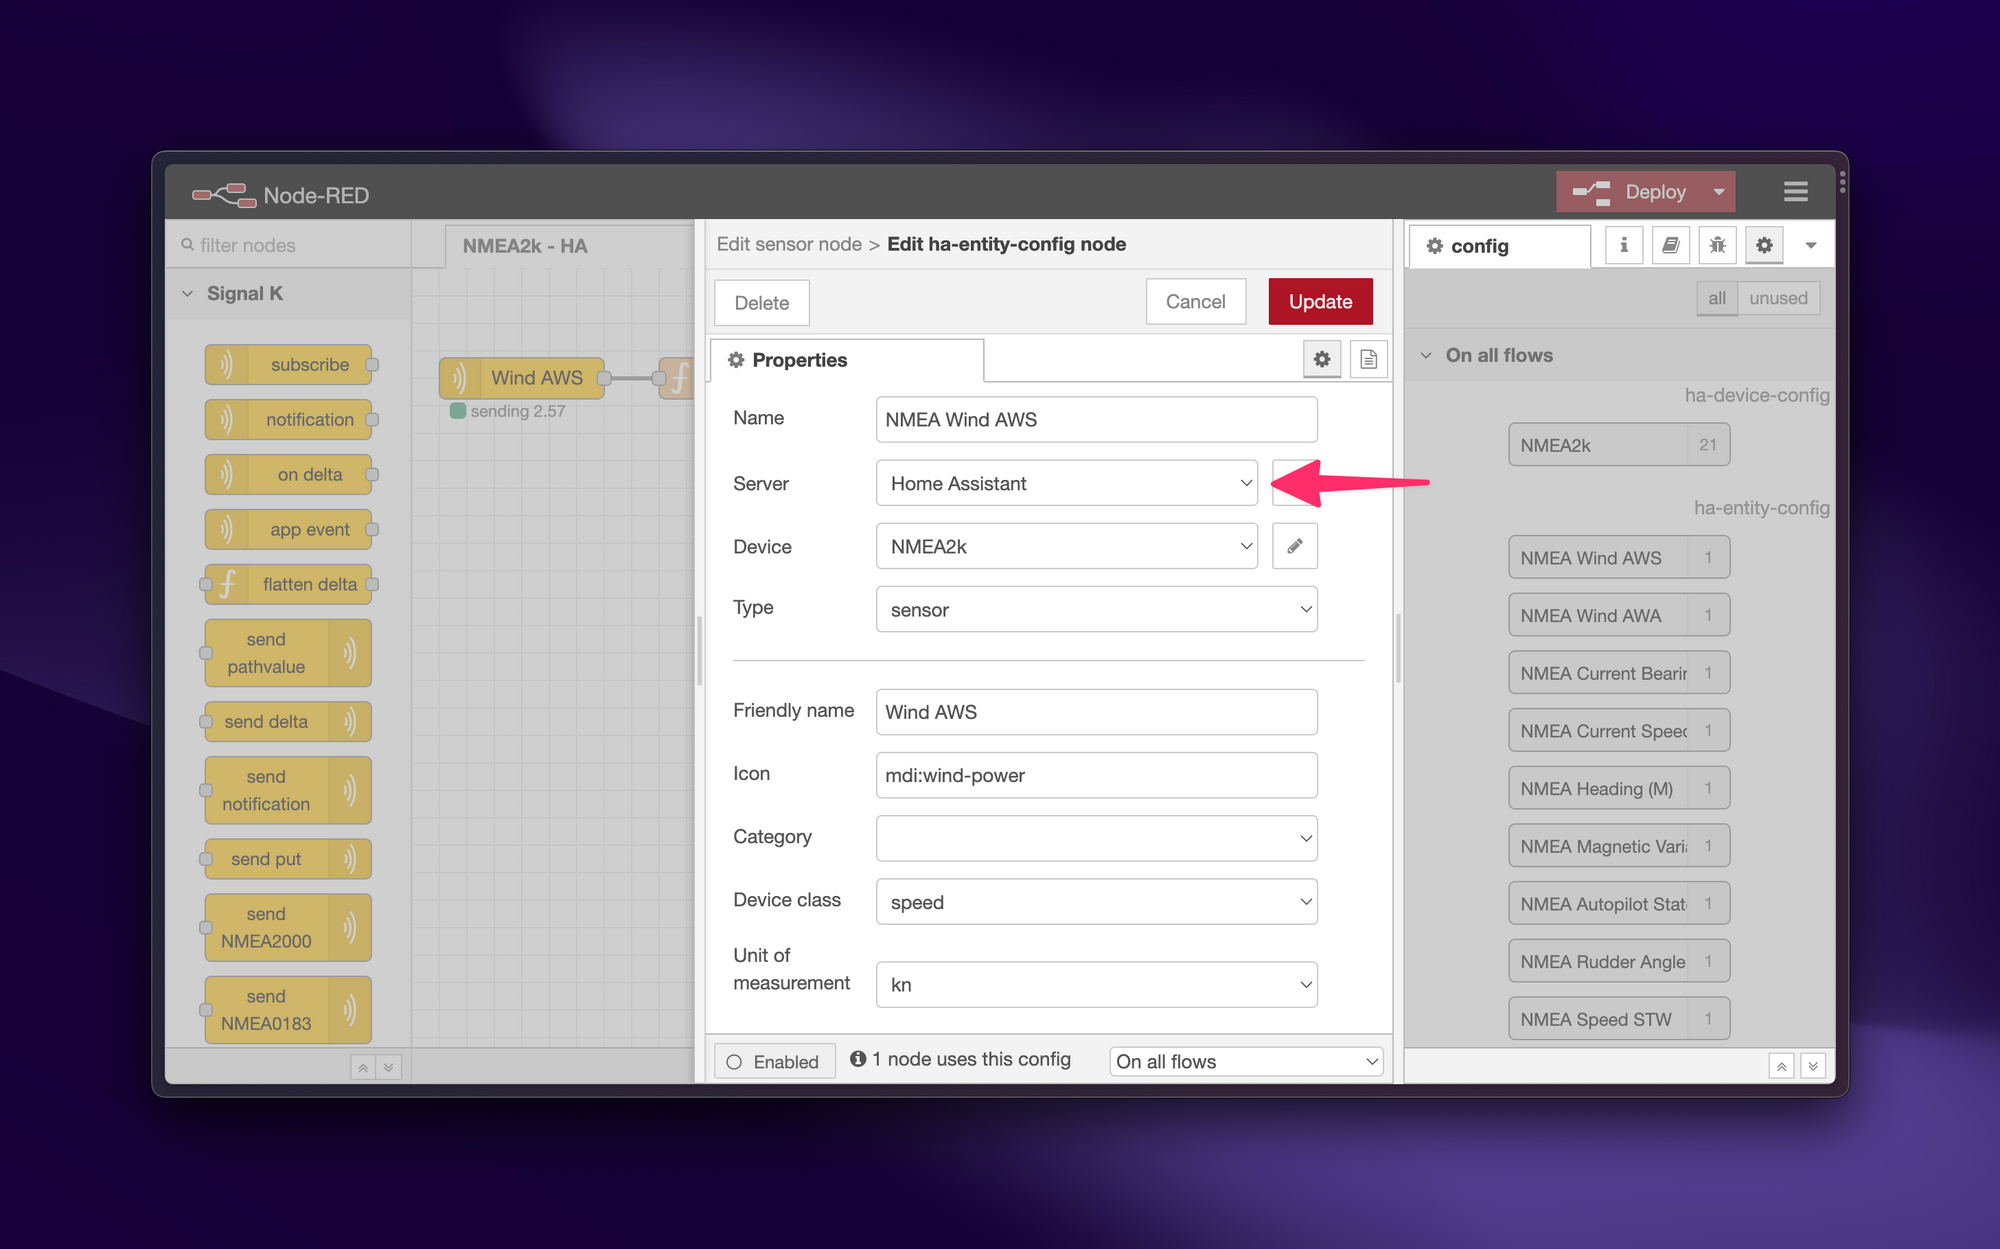
Finally, we want to send that data into Home Assistant as a new sensor. This requires a few extra steps for the first time, to make the initial connection to the Home Assistant server.
Double click into the Home Assistant Sensor node and hit the pencil icon beside "Entity Config".

Then open this dropdown and click "Add new server"
Now enter the connection details for where your Home Assistant install is located. This can use either the IP address on your local network or the name of the device where Home Assistant is running.

Now there are two things that need to be done in Home Assistant to enable this connection. First: Installing an addon. Second: Creating an access token.
For NodeRED to be able to talk to Home Assistant, you'll need to install this companion addon:
 zachowj
I strongly recommend installation via HACS. Instructions are in the link above.
Once installed, you'll need to go to Home Assistant integrations, and add "Node-RED" as an integration there:

Next, you'll need an Access Token to paste into your NodeRED server settings.
You can create an Access token for Home Assistant by going to your user profile, scrolling to the very bottom, and clicking on "Create Token".

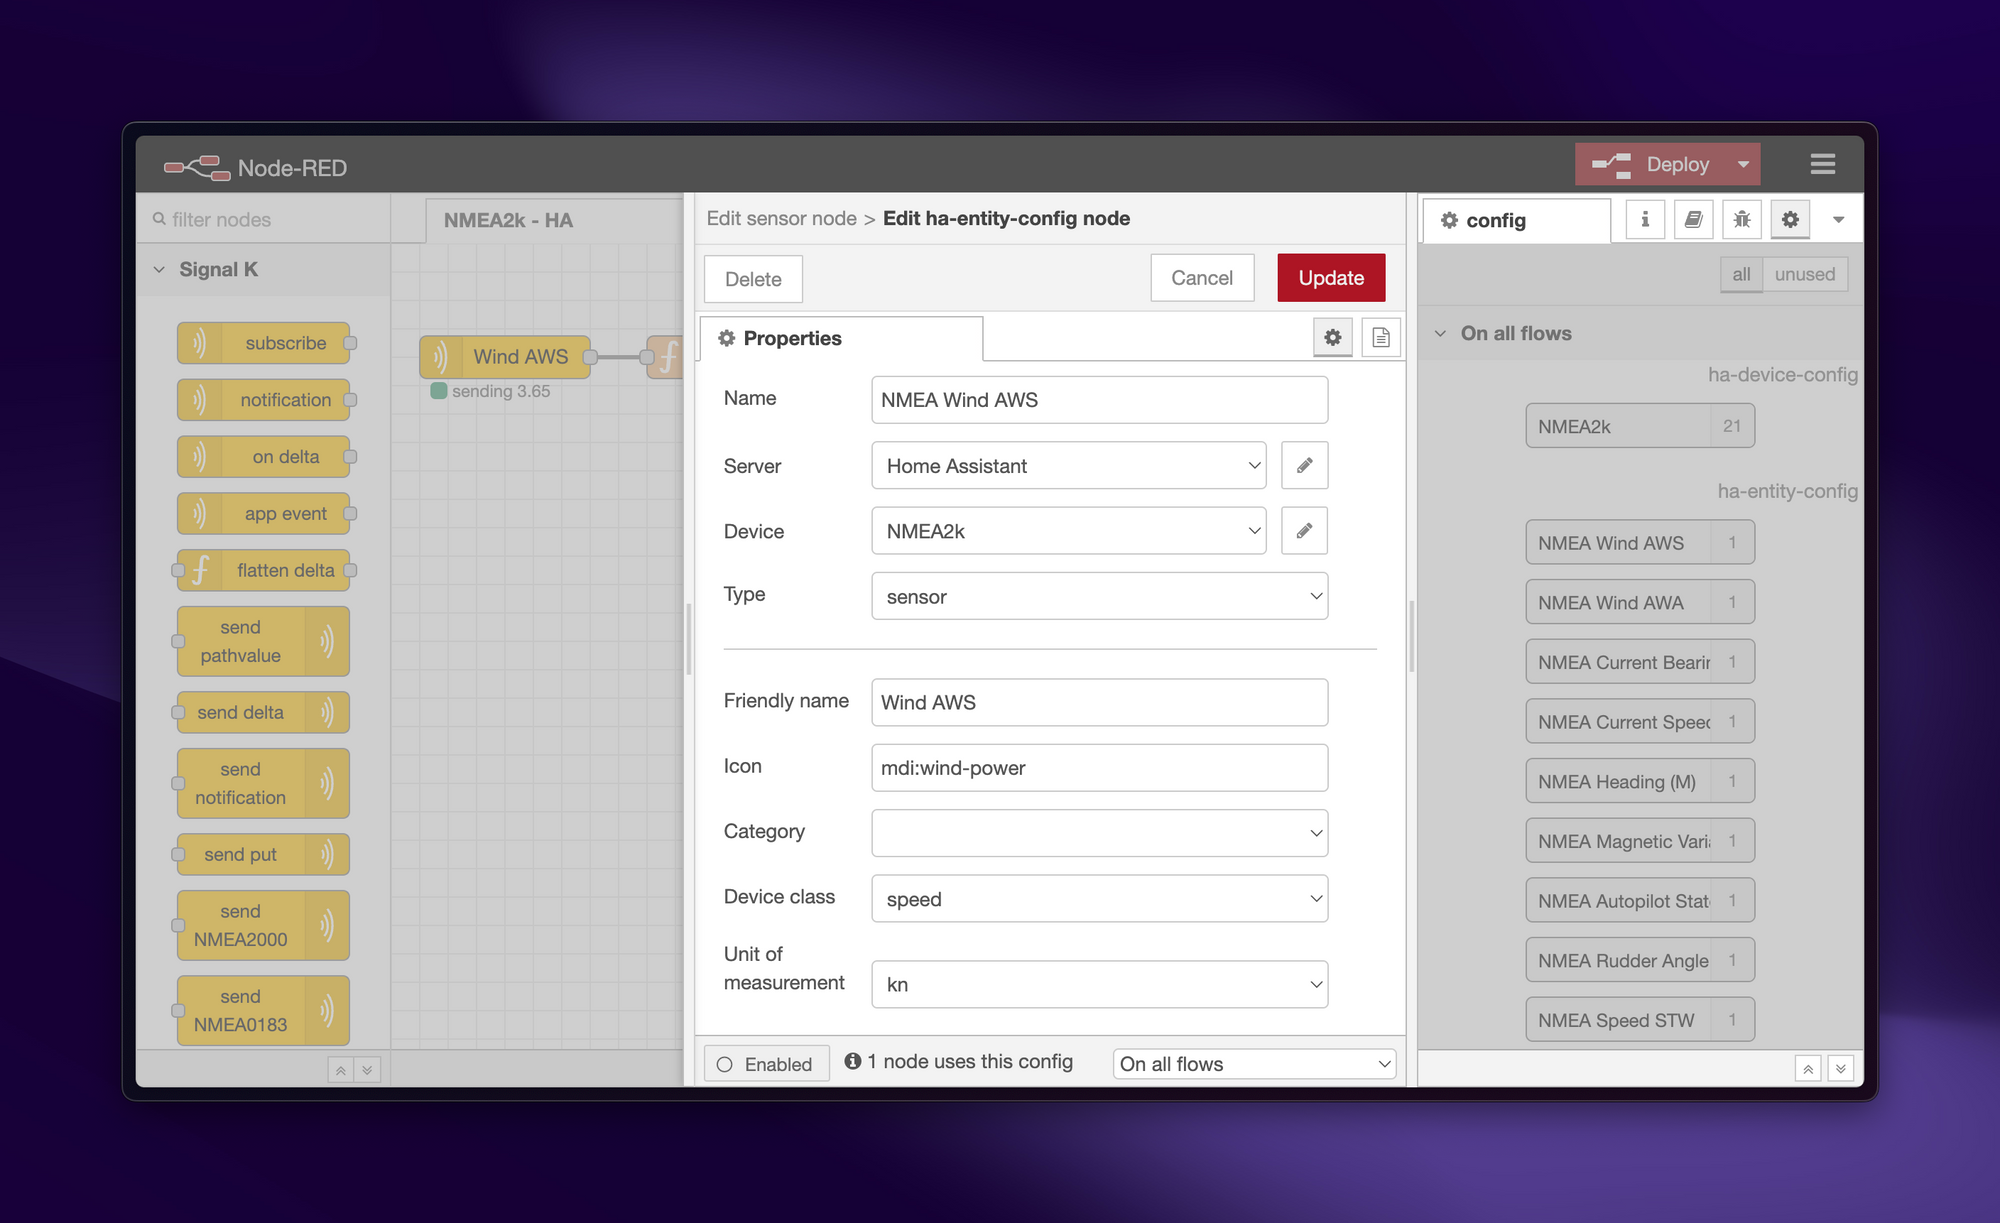
Copy the token generated, and paste it into NodeRED. Then hit "Save" on the server configuration. You only have to do this once. The server config is now saved and can be re-used on other Sensors.
InputError: Integration not loadedIf you see this error at some point — uninstall/reinstall the NodeRed companion app in HACS.
You should now be back on the Sensor configuration settings, where you can fill in the details for your sensor. In Home Assistant, sensors are grouped under "Devices" - so I recommend creating a single device called NMEA2k, and adding all the sensors you create to it. This makes it pretty easy to find everything in Home Assistant later.
Click on "Update" to save the sensor, and then click on "Deploy" in NodeRED to publish your changes.

You should now be able to locate the entity in Home Assistant:

And use it to create widgets on your dashboard:

type: gauge
entity: sensor.wind_aws
min: 0
max: 40
severity:
  green: 10
  yellow: 20
  red: 30
needle: true
Expanding with more NMEA sensors in Home Assistant
Setting up the first sensor takes a while to configure everything for the first time, but the steps are a bit quicker after that. Just go through and grab all the data you want to get into Home Assistant and create the same types of nodes.
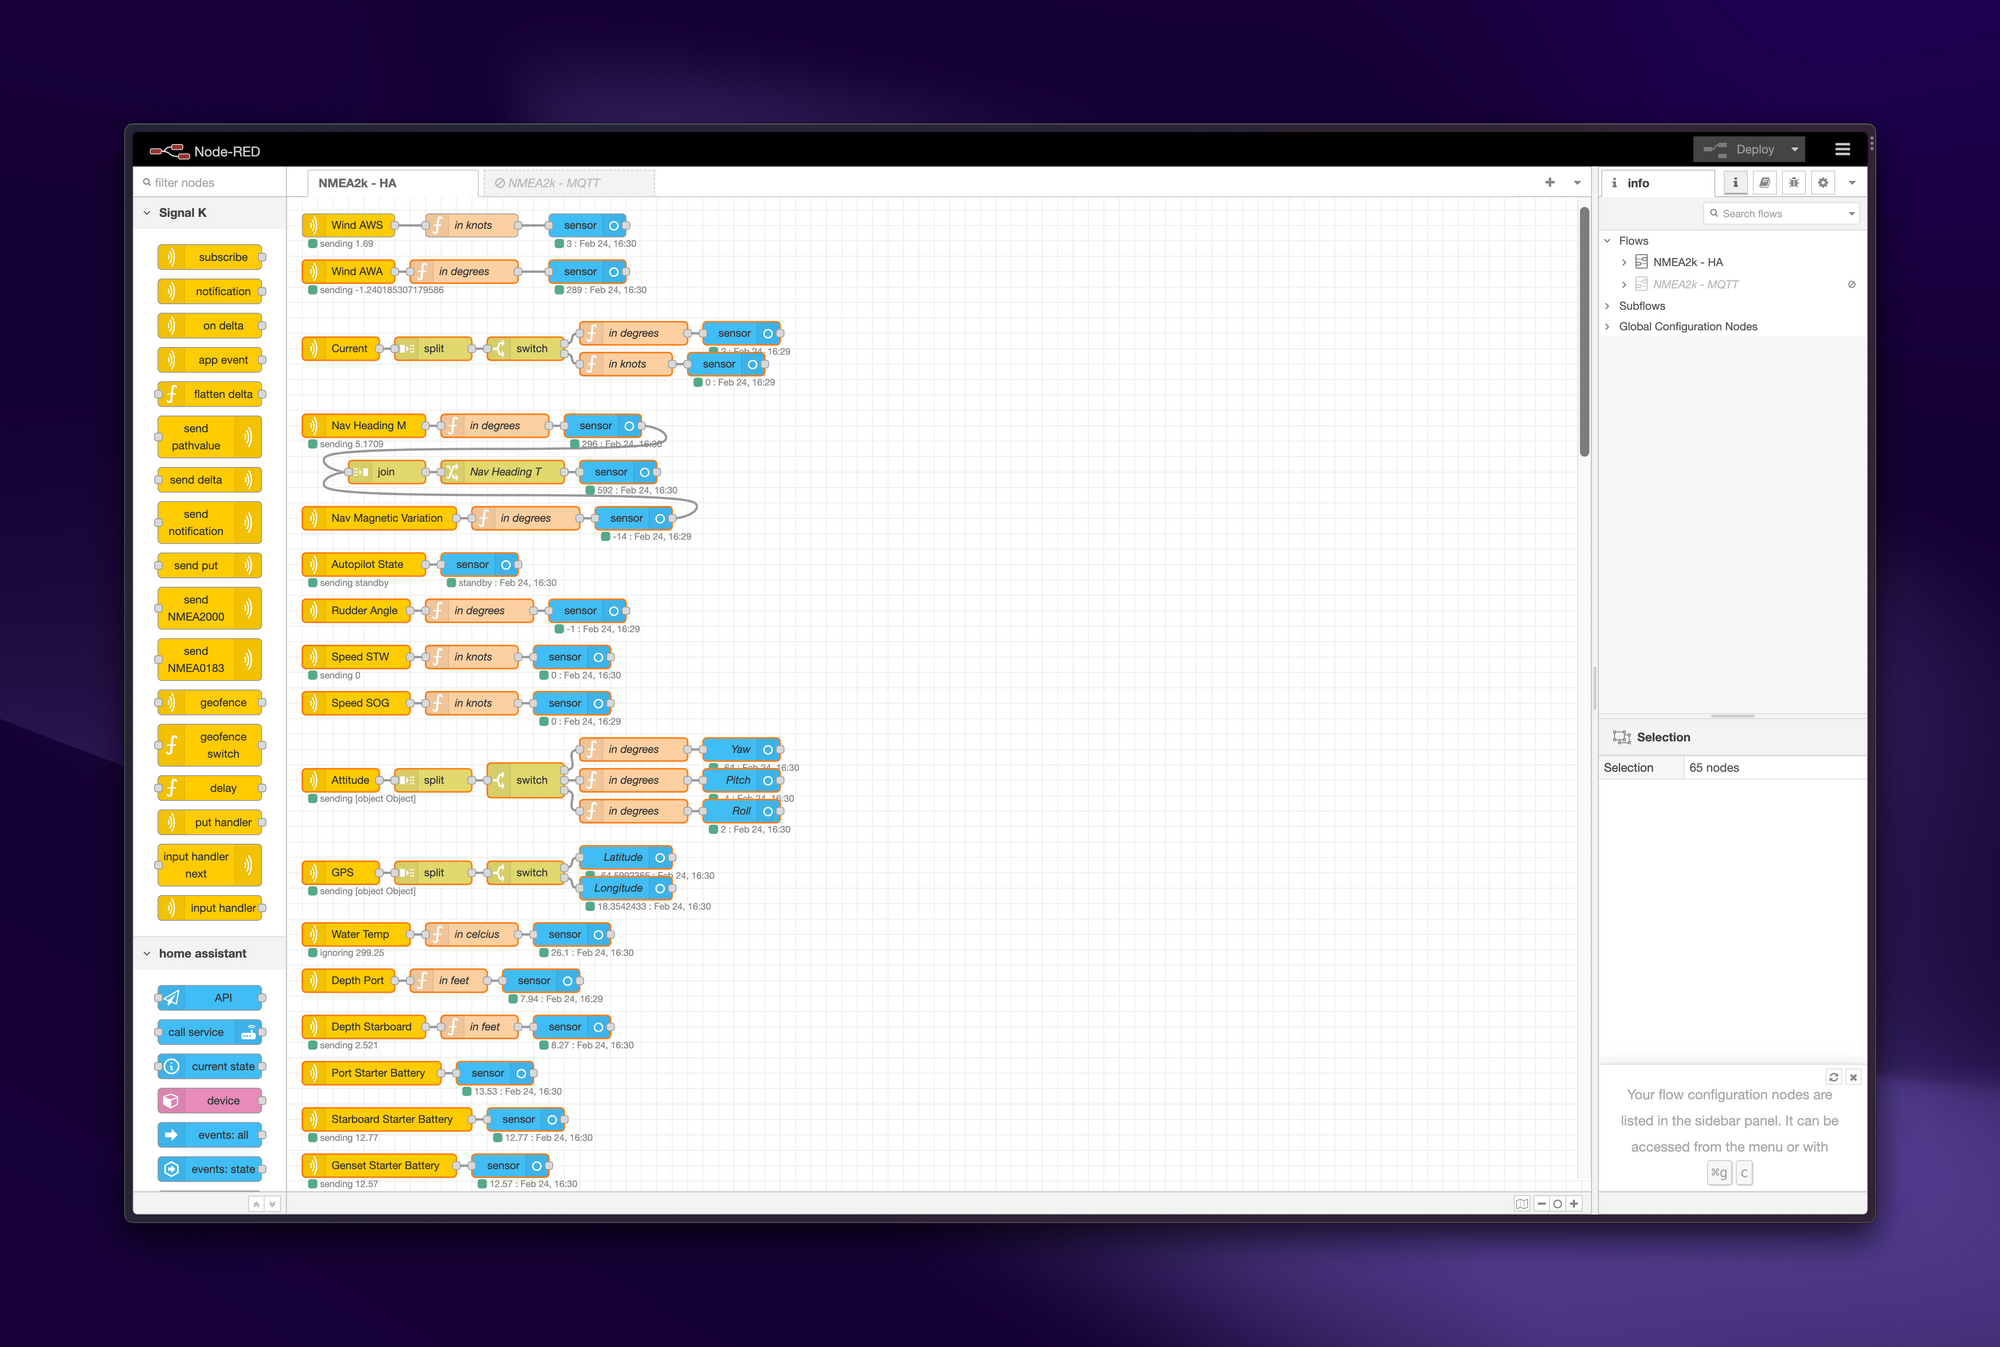
Before long, your NodeRED dashboard will look something like this:
And your Home Assistant NMEA2k device will look something like this:

If you want a shortcut, I've exported my full NodeRED palette below. You can download this file and import it in NodeRED to get a copy of all nodes, functions and configuration.
Note: This definitely won't "just work" - because it's specific to my devices, but it may be a useful reference point for how to set up various pieces of data and do the relevant unit conversions.
One note to keep in mind: HomeAssistant will only have access to NMEA data as long as the device that's transmitting it (usually your boat instruments) is turned on. So if you want data all the time, that means your instruments need to be on all the time. I leave my instruments breaker on, but turn off my MFD/plotter screen, and that works fine / draws very little power.
Ideas and next steps
From here, it's up to you what to do with all this new data! Here are a handful of ideas I've either done, thought about, or am working on...
- Add wind speed to phone/watch widgets, so you can see at a glance what the current wind speed is. This is great for when you're in an anchorage and wondering how strong that last gust was, but also great if you kitesurf and you're on the beach wondering what the current wind speed is
- Set a wind speed alarm that will send notifications / make Alexa talk if the wind gets over 30kts in the middle of the night
- Use the GPS data for more accurate GPS position updates in Home Assistant
- Put the ocean water temperature on your phone/watch so you can decide when to go swimming (I use this all the time)
- Use depth and current data to track tidal changes
- Use GPS speed data to determine whether the boat is moving or not (useful for automations that you want to run, or not-run, based on whether the boat is currently stationary or on-the-move)
- Use boat pitch and roll to measure just how gnarly it is under way... or in an anchorage
- Keep an eye on your engine/generator starter batteries, and set alarms if they get below a certain level
- Monitor tank levels (fuel, water, waste water) and set alarms if they fall below a certain level
Leave me a comment if you come up with anything else useful!

Member discussion